


In this article:
We explain the process of solvent cement jointing
We cover: Pipe Chamfering, Marking Joint Length, Cleaning, Using Cement, Drying, Pressure Testing & Best Working Practices
How to make solvent cement joints
See also: How much cement or cleaner will I need?
Preparations
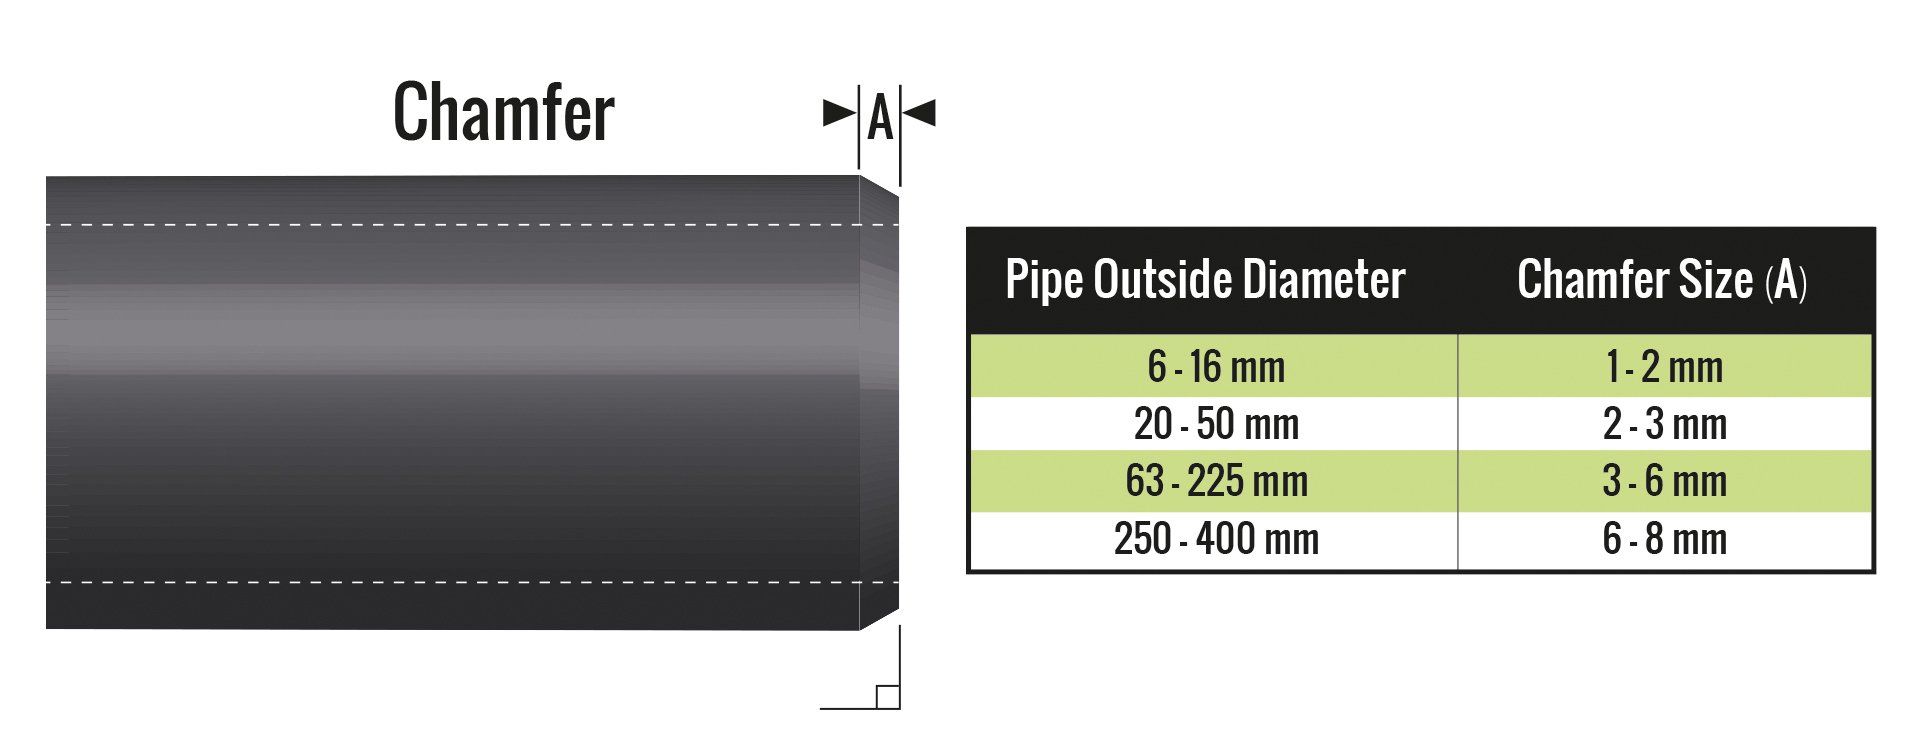
1. Chamfer your pipe
The pipe must be cut off at right angles. Remove the inside edges and chamfer the outside ones as shown in the diagram. A 15 degree angle for the chamfer is considered to be optimal. This ensures that when the pipe is inserted into the fitting, the solvent cement isn't "scraped" away from the surfaces to which they have been applied.
2. Wipe the outside of the pipe and the inside of your fitting with a clean cloth to remove any obvious dirt.
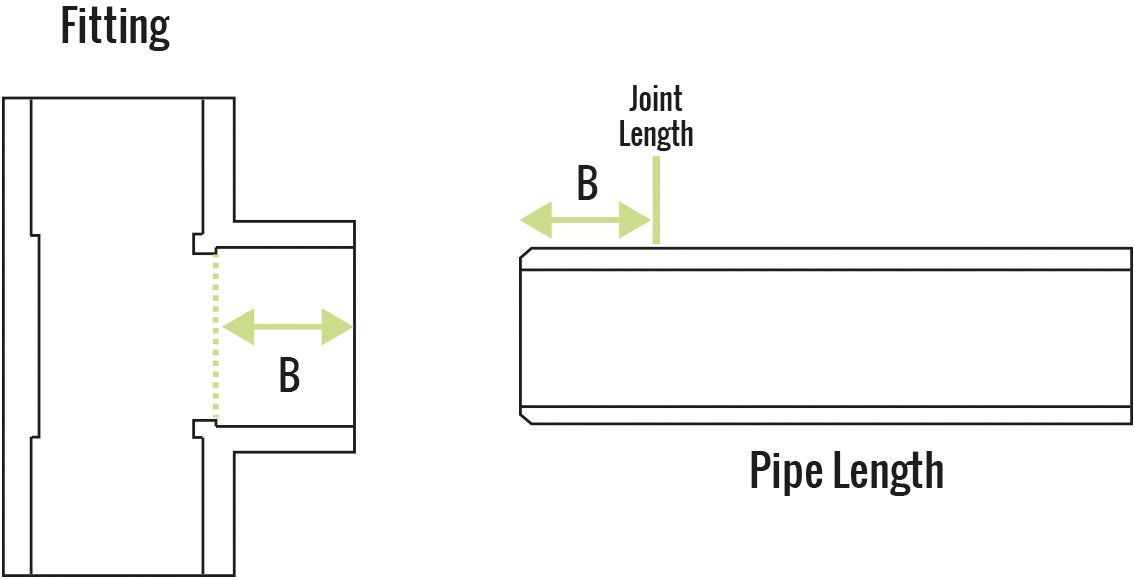
3. Mark the jointing length on the pipe.
Measure up to the stop inside the fitting (shown in the diagram as B) & mark this length on your pipe. This enables you to check afterwards whether the pipe has been inserted into the full extent of the socket.
Note: We do not recommend dry-fitting. If the outside diameter of the pipe and the inside diameter of the fitting are at their extreme tolerances, then the pipe cannot be dry-fitted into the socket. Insertion may result in not being able to separate the components.
4. Use the appropriate cleaner to prepare the surfaces
This is an important part of the cement jointing process, it prepares the surfaces and facilitates a good pressure resistant bond.
Use a cleaner specifically designed for the pipe and fitting material and apply it with a paper towel. Use a fresh paper towel for each component.
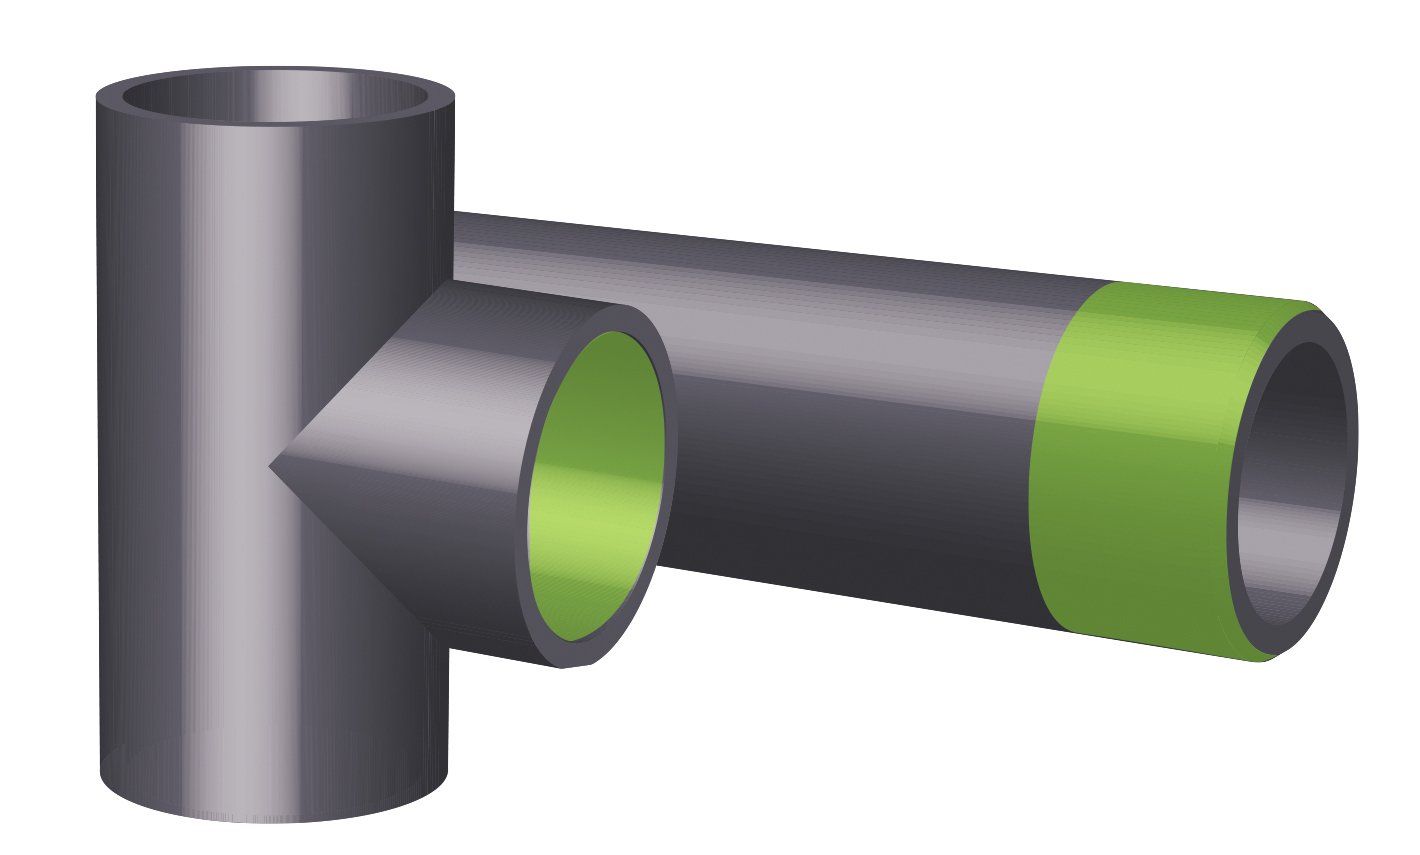
Clean the outside of the pipe end and the inside of the fitting thoroughly. You do not need to treat the whole pipe. You only need to clean the jointing surfaces up to your joint length mark as indicated in the image by green areas. Follow all safety precautions provided by the manufacturer of the cleaner.
IMPORTANT
After cleaning, Do Not Touch the areas that have been treated, they have to be dry and grease free for proper bonding.
PVC-U pipes may have a waxy surface. To ensure proper jointing, in this case, repeat the cleaning process until the surface appears matt to the eye.
Cementing
Follow any safety precautions provided by the manufacturer of the cement. The use of protective gloves is recommended to avoid contact with skin. If cement or cleaner comes into contact with eyes rinse immediately with water. Consult a doctor! Immediately change clothes that are contaminated with solvent cement.
1. Open & Prepare Cement
If your cement is in a tin remove the lid and give it a thorough stir. Check its consistency by allowing it to run from your stirring utensil, it should run evenly and smoothly when held at a slant, if it no longer runs smoothly then the cement has become unusable. Always replace lids in between joints to preserve the life of the cement. The cement must not be thinned.
IMPORTANT
Before Proceeding Please Read
Once the cement has started to be applied to the pipe or fitting there is only a limited window of time for the joint to be made (this is known as opening time). So the next steps need to be performed quite quickly, read and understand the next steps first, before putting them into practice. Dependant on your particular cement and temperature at which you are working; this time window will vary, usually from 4 mins to 30 seconds, so please check with your cement manufacturer and work according to the figures provided for their product.
2. Apply cement to pipe end and inside the fitting
Use an appropriately sized brush and load it generously with cement. Coat the jointing surfaces with cement inside the fitting and outside of pipe, up to your joint length mark. Ensure both jointing surfaces are completely covered with a smooth even layer of cement.
3. Push Pipe & Fitting Together
After applying cement, the pipe and fitting should immediately be pushed together in the correct alignment. Push slowly up to the stop inside the fitting. Do not twist whilst pushing. When the stop is reached, make any minor adjustments to the alignment and hold the joint in position for 1 minute. Remove any excess cement immediately using absorbent paper.

Waiting Time Between Cementing
A waiting time of 5 mins for upto 225mm diameter pipe should be observed, before further jointing of these components. During which time they should be left undisturbed, this time should be increased to 15 mins if temperature is below 10C. Over 225mm diameter, a waiting time of 15mins should be observed and doubled to 30 mins in temperatures below 10C. These figures relate to Tangit PVC-U Solvent Cement and will differ with different cements, always refer to the instructions from your specific cement manufacturer.
Clean Up
After use, clean the brush of excess cement with dry absorbent paper and then clean thoroughly using the cleaner. Brushes must be dry before being re-used (shake out). Replace the lid of the cement tin after use to prevent the solvent evaporating.
Protect pipes & fittings from spilled solvent cement, cleaner and any paper wipes that you have used with cement or cleaner.
Drying Period Before Pressure Test
A drying period must be observed after the last joint is made & before the application of a pressure test. The minimum drying times will depend upon your chosen cement and drying temperature. Please follow all instructions provided by your chosen cement manufacturer in regards to minimum drying times as cements can differ greatly in this regard. As a general rule for good practice, we would recommended to leave 24 hours for optimal joint strength and pressure resistance before pressure testing and commissioning of the piping system.
The information in this article is provided as a general guide to the solvent cement jointing process. Technical information relating to the performance of cements and cleaners is dependant on your chosen cement & cleaner. You should use this article as a general guide only and any technical information supplied by your cement or solvent manufacturer should override any information supplied in this article.
Summary:
• Preparing pipe & fitting properly is essential for the best leak-free bond.
• Use the appropriate cleaner & cement for your piping material.
• Adhere to the instructions from the cement & cleaner maufacturer in regards to their product properties.
• Don't dry-fit pipe and fittings, they are designed to be a tight fit and may not separate - but the uncemented joint won't be leak free under pressure.
• Observe drying times provided by cement manufacturer to avoid joint leaks.
• Pay particular attention to provided "opening times".
• Temperature at which you work will affect the jointing process.
• Solvent Cements & Cleaners can be dangerous follow all health & safety instructions provided.